🍯 Recipe Collections: Jams, Jellies & Condiments

Homemade Salted Caramel Sauce (4-Ingredient)

Prep Time: 5 minutes
Cook Time: 10 minutes
Total Time: 15 minutes
Servings: 10 servings

Ingredients:

1 cup granulated sugar
6 tablespoons unsalted butter, sliced into 1-inch pieces and softened
½ cup heavy cream
2 teaspoons flaky sea salt

Directions:

In a deep saucepan, place sugar in an even layer. Heat sugar over medium-high heat, whisking frequently. Once sugar starts melting down, whisk continuously until all the clumps are melted into liquid (this can happen quickly, so watch carefully that the sugar doesn’t burn. See video in original article for visual.)

Immediately turn the heat down to medium and insert the candy thermometer into the melted sugar; gently stir until the liquid turns reddish-brown in color – the minute your thermometer reaches 350°F, slowly add the butter – caramel will bubble up, so be careful.

Continue to gently stir until fully melted; try not to let the mixture splash up the sides of the pan. Once the mixture is smooth, immediately remove the pan from the heat. Carefully pour in the cream and whisk until a smooth, thick sauce forms. Whisk in the flaky salt. Let the sauce cool to almost room temperature before drizzling it over dessert. Store leftover sauce in an airtight glass container in the fridge for future use.

Notes:

If you can’t find flaky sea salt, you can use coarse kosher salt in a pinch.

Caramel sauce can be kept in an airtight glass jar in the fridge for up to a month. Great for gift-giving, too.

Chilled caramel sauce may need slight reheating in the microwave before drizzling.

Caramel Sauce Recipe Tips for Success:

A candy thermometer or other kitchen thermometer is an essential tool. It allows you to be precise and avoid burnt caramel that nobody’s a fan of. You’ll also come to realize that a candy thermometer is a handy tool to have in your kitchen beyond caramel.

Be sure to whisk sugar until all bits of sugar are dissolved; this is important for a velvety smooth caramel sauce.

In fact, whisking is the name of the game with homemade caramel sauce. Keep whisking at all stages to ensure your caramel is smooth and doesn’t burn.

Your golden caramel sauce will come together rather quickly, so before you know it, you’ll have a beautiful jar of Salted Caramel Sauce to keep in the fridge for favorite ice cream recipes or caramel popcorn.

Make big batches of caramel sauce and place them in mason jars for gifting. These are ridiculously awesome food gifts that keep really well in the fridge.

Caramel Sauce Commonly Asked Questions:

What is caramel sauce made of?

Our caramel sauce recipe contains only 4 simple, pure ingredients: sugar, butter, cream, and salt. Nothing artificial goes into this caramel recipe.

What makes a caramel sauce thicker?

Some caramel sauce recipes use thickeners such as corn starch or tapioca starch. The caramel sauce recipe below does not need any thickeners

Does caramel sauce need to be refrigerated?

You can keep caramel sauce in an airtight container at moderate room temperature for a few days. After this, it needs to be kept chilled, as caramel sauce contains dairy products.

How do you know the caramel sauce is done?

Caramel sauce can burn easily if you’re not vigilant, so watch carefully as you stir. Once you’ve added in the butter, stir just until it is melted and remove from the heat immediately. A candy thermometer is an important tool for consistent results.

Nutritional Facts:

Serving: 1g | Calories: 175kcal | Carbohydrates: 22g | Protein: 2g | Fat: 9g | Saturated Fat: 4g | Polyunsaturated Fat: 1g | Monounsaturated Fat: 4g | Cholesterol: 13mg | Sodium: 5mg | Potassium: 65mg | Fiber: 0.5g | Sugar: 21g | Vitamin A: 175IU | Vitamin C: 0.1mg | Calcium: 13mg | Iron: 0.2mg

Recipe courtesy of Chew Out Loud.com
3 Likes

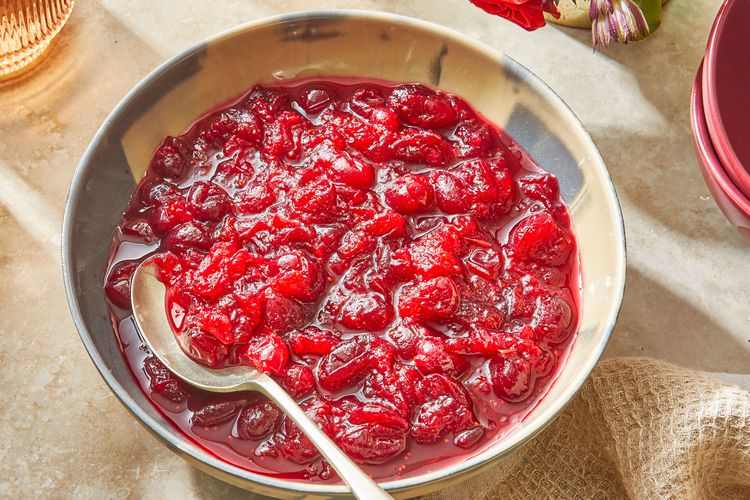
Cranberry Orange Sauce

Active Time: 15 mins
Cool Time: 10 mins
Total Time: 25 mins
Yield: 2 1/4 cups

Ingredients:

3/4 cup granulated sugar
1 cup fresh-squeezed orange juice (from 2-3 oranges)
1 (12-oz.) package fresh cranberries, rinsed and drained
2 cinnamon sticks
1 Tbsp. grated orange zest
1 tsp. grated ginger

Directions:

Combine sugar, orange juice, and cranberries in a medium saucepan over medium heat. Bring to a boil.

Add cinnamon sticks, orange zest, and ginger.

Reduce the heat, and simmer for 10 minutes, or until 2/3 of the cranberries have burst. Stir occasionally to keep the sauce from sticking to the bottom of the pan.

Remove from burner. Allow the sauce to come to room temperature or chill before serving. Remove cinnamon sticks before serving.

Notes:

Substitutes for Fresh Cranberries:

I love cranberry everything throughout the year, so I often buy extra and freeze them for use when they aren’t available in grocery stores. If you cannot find fresh cranberries and did not freeze some for future use, you have a couple of options.

Frozen cranberries: Some grocery stores maintain frozen cranberries year-round. When making this cranberry orange sauce recipe, you don’t even need to thaw them; just use them as fresh in the recipe. If your grocery store doesn’t carry them (like mine in Florida), there are a number of farms that will ship a larger quantity to your door.

Dried cranberries: As a substitute for fresh cranberries, 1 1/2 cups equals 12 ounces, the amount needed for one batch of this cranberry sauce. The first adjustment for dried cranberries is to add an extra 1/2 cup of berries. Then comes the rehydrating. Boil enough water to cover the berries, and pour it over them in a heatproof bowl. Cover the bowl, and let them sit for 30 minutes. Drain with a mesh sieve until all the water is gone. Then make the recipe, except eliminate the sugar if your cranberries are sweetened (most are, so be sure to check on the package).

The other change with dried cranberries has to do with texture. The pectin (which naturally is released to thicken the sauce made with fresh cranberries) is eliminated during the drying process. You won’t hear any popping to clue the end of cook time. I boiled all the ingredients for 7 minutes, stirring occasionally to keep the sauce from sticking. You will notice that once cooled, it is not as vibrant red in color, and because of the pectin loss, not as jelled. But the flavor is still that wonderful sweet-tart of homemade cranberry orange sauce.

How Far Ahead Can I Make Cranberry Orange Sauce?

Cranberry orange sauce is a great contender for a make-ahead dish. It’s best served chilled so it has time to set, and it is good in the refrigerator for up to two weeks.

I like to make mine the day before, so its shelf life is extended enough for me to slather it on leftover turkey sandwiches, cover my pumpkin pie and cheesecake with it, and sneak spoonfuls when I’m feeling snacky.

Can I Freeze Cranberry Orange Sauce?

Yes, you can freeze cranberry orange sauce. Let’s say you just can’t finish the leftover sauce in that two-week window. The best thing to do is transfer it to a freezer container, where it will be good for another six months. Or you could make a double batch and know some will be on hand for a while.

Recipe courtesy of Southern Living.com

4 Likes

Tartar Sauce :fish:

Prep Time: 15 minutes
Total Time: 15 minutes
Servings: 5 servings (1/2 cup + 2 tbsp)

Ingredients:

1 lemon, see note 1
1/2 cup mayo, see note 2
1-1/2 tablespoons sweet pickle relish or diced pickles—see note 3
1 tablespoon finely chopped fresh dill
1/2 teaspoon Worcestershire sauce
1/2 teaspoon Dijon-style mustard
Salt and Pepper

Directions:

  1. Zest and juice a lemon to get 1/2 teaspoon zest and 2 tablespoons juice. Combine all ingredients in a medium bowl. Season to taste with salt and pepper (I add 1/8 teaspoon of each). Mix well, taste, and adjust ingredients to your personal preference. Refrigerate sauce (covered) until ready to use. (The flavors will intensify as it sits.) Re-stir before using.

  2. Enjoy your homemade Tartar Sauce with fish, fries, or any dish of your choice! Lots of ideas in the blog post!

Notes:

Note 1: I love zesting the lemon with a fine grater and then juicing with this citrus juicer.

Note 2: Use a good mayonnaise; the better the mayo, the better the sauce will taste. I love Hellman’s/Best Foods®. The full-fat version gives the sauce an incredibly rich, smooth flavor.

Note 3: Heinz® is my brand of choice for the sweet pickle relish. If you don’t want to use relish, finely dice bread-and-butter pickles instead!

Storage: Store Tartar Sauce in an airtight container in the fridge. It can be kept for up to 1 week. Before serving, give it a good stir to redistribute the ingredients, as the sauce may separate during storage. If it thickens too much during storage, thin it with a drizzle of lemon juice.

Storage:

Store Tartar Sauce in an airtight container in the refrigerator. It can be kept for up to 1 week. Before serving, give it a good stir to redistribute the ingredients, as the ingredients may separate during storage. If it thickens too much, thin it with a drizzle of lemon juice.

Tartar Sauce is a great sauce to make ahead of time. It only gets more flavorful as it sits.

Nutritional Facts:

Serving: 1serving | Calories: 200kcal | Carbohydrates: 3g | Protein: 0.4g | Fat: 21g | Saturated Fat: 3g | Polyunsaturated Fat: 13g | Monounsaturated Fat: 5g | Trans Fat: 0.1g | Cholesterol: 12mg | Sodium: 237mg | Potassium: 17mg | Fiber: 0.1g | Sugar: 2g | Vitamin A: 96IU | Vitamin C: 3mg | Calcium: 4mg | Iron: 0.1mg

Nutrition information is automatically calculated, so it should only be used as an approximation.

Recipe courtesy of Chelsea’s Messy Apron.com

5 Likes

Dandelion Jelly Recipe (Honey-Sweetened)

Yield: 4- 8 oz. jelly jars

Ingredients:

A large bowl full of dandelion heads, approximately 16 cups before sorting
Pomona’s Pectin
Honey
A muslin or a flour sack towel
A 4-cup glass container or quart-size canning jar
4 8 oz. jelly jars with lids and bands
A large pot or water bath canner

Directions:

Start by picking dandelion heads. You want ones that are fully flowered out and mature. If the centers are still closed, they are not yet mature and will taste more bitter.

Remove the yellow petals from the flower and add them to your 4-cup container or quart jar. You can either pick the petals off by hand or cut them off with scissors, but try to avoid getting any of the green leafy parts into the jar.

You will continue doing this until the petals are filled all the way to the top. Then lightly press down. The slightly compressed flower petals should equal approximately 3 cups.

Heat up 4 cups of water until boiling, and add it to your jar until completely full of the boiling water and flower petals. Let this “tea” steep for a minimum of 4-5 hours. I’ve let it sit overnight as well.

Strain the liquid away from the mixture. I found that lining a colander with a flour sack towel was the best way to do this. You can then give the towel a squeeze to get any remaining liquid out of the flower petals.

Heat up your jars and prep your canning supplies if you will be canning the jelly. I like to fill my canner to the height of my jars with water and bring it to a boil while I’m prepping my recipe. If you need to sterilize your jars, let them boil for 10 minutes. If you are just heating them, shut off the heat and let them sit in the hot water until you are ready to use them.

You will then pour the strained liquid into a pot over medium heat. If you want to be precise, the liquid should measure 3 Âź cups.

Add ¼ cup of lemon juice and 4 tsp. of calcium water to the mixture, and stir well. If you have never used Pomona’s Pectin before, follow the instructions that come with it for making and storing the calcium water.

Whisk well, and slowly bring the mixture to a boil.

While the mixture is heating up, measure out 1 ½ cups of honey into a separate bowl.

Add 4 tsp. of the pectin powder to the honey, and whisk well until fully dissolved in the honey.

After your tea mixture comes to a boil, slowly start adding the honey and pectin, whisking briskly to combine.

Bring the mixture back to a boil, continuing to whisk well so that the honey and pectin are evenly distributed. It will foam up a bit. Just continue to stir until it boils at a rolling boil for 1 full minute. Make sure you are getting along the bottom edge of your pot with your whisk, as the pectin likes to settle there.

Then, after boiling for 1 minute, shut off the heat and immediately distribute the mixture into your canning jars, leaving 1/4 inch headspace.

Wipe the edges of the jars with a wet paper towel and place your canning lids and bands on. Tighten the bands with one hand, secure, but not too tight!

Place the jars in your canner, making sure they are covered with 2-3 inches of water. Cover and bring to a boil.

Process for 5 minutes in your water bath canner. Turn off the heat and let cool 10 minutes before removing jars.

Let cool on the towel without disturbing them for 12 – 24 hours. Ensure that the lids are sealed before storing.

Notes:

How long is dandelion jelly good for?

Canned, the jelly is best used within a year. Once opened, the jelly is good in the refrigerator for up to two weeks.

Do I have to use Pomona’s Pectin?

No, you can use a different type of pectin, but you must follow the instructions given with that pectin, which usually includes adding sugar. You cannot use 100% honey as a sweetener with most types of pectin.

What does dandelion jelly taste like?

Dandelion jelly tastes a lot like honey (even before sweetening it with honey!) with a slight brassica undertone. I think you will be pleasantly surprised!

Here are some more interesting facts about dandelions!

What is the scientific name for dandelions?

The botanical name for dandelion is taraxacum officinale.

Are dandelions native to the United States?

No! Dandelions were originally brought to America from Europe and Asia for their health benefits.

What are some other names for dandelions?

Blow Ball Cankerwort, Lion’s Tooth, Puff Ball, Pissabed Priest’s Crown, Pu Gong Ying, Swine Snout, Telltime, White Endive.

In French, they are called pissenlit, which literally means ‘bedpissers’ due to their diuretic properties

What is the origin of the word dandelion?

The English name, dandelion, comes from the jagged shape of its leaves, which the Medieval French deemed “Dent-de-lion.” This literally means “lion’s tooth.”

Are all parts of a dandelion edible?

Yes! Each part of the dandelion has different uses and medicinal properties.

Can eating dandelions make you sick?

Yes, but understanding why it might will alleviate any fears you may have about consuming them. Some people are allergic to the pollen on dandelions. If you have seasonal allergies, you may want to save the harvesting for someone else and proceed slowly with consuming them.

Recent studies on allergies make me believe that exposure to pollen in small amounts may actually be beneficial! Of course, if you notice any sign of allergy, contact your doctor, or in the case of an anaphylactic reaction, call 911!

There have also been rare cases of poisoning caused by consuming excessive amounts of dandelion tea, or by children who have consumed a large number of stems. As long as you remember that anything with medicinal properties can be dangerous in large quantities, you will be just fine!

One other possible danger of consuming dandelions is actually caused by the toxins that are often sprayed on them. This can be avoided by only consuming dandelions you have grown yourself and know to be unsprayed.

Recipe courtesy of The From Scratch Farmhouse.com

2 Likes

4-citrus Strawberry Jam/Preserves

Ingredients:

4 pounds strawberries, cut up (frozen is fine)
2 cups sugar
1 lemon, juiced
1 small orange, juiced
1 small tangerine, juiced
1 medium grapefruit, juiced
** all the citrus juices together should equal about 3/4 cup
1/4 teaspoon freshly grated nutmeg
fruit pectin, powdered

Directions:

In a large pot, combine the strawberries, sugar, nutmeg & the citrus juices.

Bring to just a simmer & cook on low until it starts to thicken. Add fruit pectin according to package instructions until desired consistency. (Keep in mind it will thicken more as it cools)

When thoroughly cooked down & thickened, plate test the preserves (put a small amount on a plate, let it cool & tilt to make sure the preserves aren’t runny)

Fill pint jars or small jelly jars, wipe rims clean, and put lids on. Process in a water bath for 10 mins.

When cooled, the center of the lid should automatically indent.

Recipe courtesy of Just a Pinch.com

Note from Amethyst: They didn’t put much info in this recipe, especially about the canning. If you want more there’s this nifty guide from the USDA:

https://nchfp.uga.edu/papers/guide/GUIDE07_HomeCan_rev0715.pdf

2 Likes

Great Goddess Moretum

Serves: 6

Ingredients:

4-5 cloves fresh garlic, finely minced
3 ounces fresh feta cheese
3 ounces Pecorino Romano (roughly grated)
3 ounces Ricotta cheese
4 stalks of lovage and leaves
1 bunch of coriander ( cilantro) leaves, finely minced
2-3 tablespoons small bunch of fresh rue leaves, finely minced. (If you can’t find rue use another bitter herb such as dandelion, garlic mustard or young fresh mugwort)
½ cup of minced crow garlic greens (you can also use chives or green onions)
4 tablespoons olive oil
2 tablespoons white wine vinegar

Directions:

Mince the garlic and roughly chop up your cheese and herbs.

Combine until smooth in a food processor.

Add vinegar and oil to the cheese and process until smooth.

Let it sit for at least 30 minutes, preferably overnight, to allow flavors to develop.

If you want to serve as pizza, just spread your flatbread with the Moretum, a few additional flakes of cheese and warm in the oven at 350 for 10 minutes or so.

Notes:

Interestingly, rue has a long association with women’s magic. It is sacred to Diana and, in particular, to the goddess of magic, Hecate. Like many ancient women’s herbs, it has historical use as an abortifacient – so exercise caution if you are pregnant or trying to conceive!

Moretum is often referred to in the Late Republican and Early Imperial periods as a simple, vegetarian meal. One preserved Recipe states the “basic ingredients are four cloves of garlic, one-half a celery stick with leaves still attached, fresh parsley, rue, coriander seeds, some mild sheep cheese with a ricotta-like consistency, olive oil, and vinegar”.

The ingredients are added into the mortar, one by one, pulverized and minced together with a pestle, then mixed into the cheese and stirred until the mixture is a uniform green color. This was made into a dip consumed with or on bread.

Recipe and notes courtesy of Gather Victoria.com

2 Likes

Love the name of the dish, the history behind it, and the magickal lore! :green_heart: :blush:

2 Likes

I’ve found a few interesting sites, looking for seasonal recipes. I’m surprised there aren’t more!

2 Likes

Me too! It seems like more and more people are craving connection with the seasons, and one great way to do that is through seasonal foods and recipes. Perhaps there will be more sites and spaces like that in the future! :grinning_face:

1 Like

I hope so. It’s very interesting information!

1 Like

Raspberry Peach Jam

Yield: 3 half-pints
Prep: 35 min
Cook: 15 min

Ingredients:

2-2/3 cups finely chopped peeled peaches
1-1/2 cups crushed raspberries
3 cups sugar
1-1/2 teaspoons lemon juice

Directions:

In a Dutch oven, combine all ingredients. Cook over low heat, stirring occasionally, until sugar has dissolved and mixture is bubbly, about 10 minutes. Continue cooking until thick, 5-10 minutes, stirring occasionally. Remove from the heat; skim off foam.

Carefully ladle hot mixture into 3 hot half-pint jars, leaving 1/4-in. headspace. Remove air bubbles, wipe rims and adjust lids. Process for 15 minutes in a boiling-water canner.

Notes:

Canning Altitude Jam-Jelly
The processing time listed is for altitudes of 1,000 feet or less. Add 1 minute to the processing time for every 1,000 feet of additional altitude.

Recipe courtesy of Taste of Home.com

1 Like

Easy Tomato Chutney

Prep Time: 10 minutes
Cook Time: 30 minutes
Total Time: 40 minutes
Servings: 8

Ingredients:

1lb / 500g Fresh Tomatoes, finely diced (here I use Vine-Ripened)
7oz / 200g Red Onion, finely diced
1/2 cup / 100g Light Brown Sugar
1/4 cup / 60ml Red Wine Vinegar
1 tbsp Balsamic Vinegar
1 Red Chili, deseeded & finely diced (optional)
1 clove of Garlic, minced/finely diced
dash of Olive Oil
Salt & Black Pepper, to taste

Equipment:

2 Jars (see notes)
Large Pan & Wooden Spoon
Sharp Knife & Chopping Board

Directions:

Add onion, chili, and garlic to a large pan over medium heat with a dash of olive oil. Gently fry until they begin to soften. Don’t allow them to char.

Add in tomatoes, sugar, red wine vinegar, balsamic vinegar, and a good pinch of salt and pepper. Give it all a good stir.

For a quick chutney, just place it on a rapid simmer and stir until it reduces. This should take around 20 minutes. Whilst it’s quick, the texture won’t be as thick/glossy and the flavours won’t be quite as developed, but it still does the trick.

Or, keep on a low simmer for 1-1.5 hours, stirring occasionally until the chutney reduces to a jammy consistency. Check for flavour preference (see notes).

Allow to cool, then serve or store (see notes).

Notes:

Storage - I usually only keep this on hand in the short term, so tightly sealed in the fridge for 4-5days (longer at your discretion) will be fine. You can preserve long-term, but you’ll have to sterilize the jars. Here is a great article on How to Sterilize Jars for Chutney.

Usage - This is obviously fantastic in sandwiches, but also works great in a grilled cheese and in burgers. It’s perfect on a cheese board and even great stirred through a tomato pasta sauce!

Flavour Preference - Chutneys are a balance of sweet and sour, one of which is often down to personal preference. This offers a slightly sweeter chutney. You can taste test and adjust slightly as needed. Just note the flavours will be different once the chutney has fully reduced and the flavours have married together.

Quick versus long simmer - A longer simmer will give you a more authentic texture and slightly more developed flavour. If you’re doing the quick version, it’s crucial to very finely dice the tomatoes/onions/chili; otherwise, they won’t have enough time to completely soften before the liquid thickens. Also important to fry & soften the onions/garlic/chili, or again, they won’t have enough time to fully soften.

Recipe courtesy of Something About Sandwiches.com

1 Like

Violet Honey Butter

Ingredients:

½ cup violets
gently warmed honey, around 3 T. or more, give or take
4 oz. Organic butter, grass-fed if possible

Directions:

First, make your Violet Honey:

Harvest 1/2 cup of flowers in the morning after the dew has burned off; this is when their volatile flavour compounds are high

Wilt the flowers (to remove excess liquid), then place in a jar and pour in some gently warmed honey. Cover with a lid and place in a warm place for a week or two (every couple of days, open the lid and wipe off any condensation that has formed)

After your honey has sat the appropriate time, gently warm once again, then strain through a fine sieve or muslin cloth. Store in a glass jar. (Should be good as long as year as long as it isn’t too runny, meaning there may be too much water in it)

Now you’re ready to make your whipped honey butter:

Whip four ounces of organic butter (grass-fed if you can get your hands on it) with a mixer (or by hand if you wish) until fluffy

Gradually add in your violet-suffused honey (about three tablespoons – or more- according to the sweetness you prefer) and mix until well-blended

Notes:

I also stirred in a few minced wild violet blossoms into the honey butter – it was so pretty and added little perfumey piquant jolts of flavour!

Recipe courtesy of Gather Victoria.com

1 Like

Dijon AĂŻoli

Yield: 6 tablespoons

Ingredients:

Âź cup mayonnaise
2 teaspoons stone-ground Dijon-style mustard

Directions:

In a small bowl, combine mayonnaise and mustard, stirring to blend.

Cover and refrigerate until needed.

Recipe courtesy of Tea Time Magazine.com

2 Likes

Orange Marmalade

Prep Time 10 minutes
Cook Time 3 hours
Overnight soak 8 hours
Total Time 11 hours 10 minutes
Servings 96 servings (2 tbsp each)

Ingredients:

4 large seedless oranges scrubbed clean (about 3 pounds or 8 cups slices, see note 1)
2 lemons (about ½ pound or 1 cup slices)
8 cups water
8 cups granulated sugar

Directions:

Cut oranges and lemons in half crosswise, then into very thin half-moon slices. Discard any seeds. In a Large Stainless Steel Pot, add the sliced oranges, lemons, and any accumulated juices.

Add water and bring the mixture to a boil, stirring often. Remove from the heat and stir in the sugar until it dissolves. Cover and let stand overnight at room temperature.

The next day, bring the mixture back to a boil. Reduce the heat to low and simmer uncovered for 2 hours. Turn the heat up to medium and boil gently, stirring often, for another 30 minutes.

Skim off any foam that forms on the top. Cook the marmalade until it reaches 220 degrees (you must hit this temperature for the natural pectin to gel with the sugar).

To test if the marmalade is ready, place a small amount on a plate and refrigerate it until it’s cool but not cold (see note 4). If it’s firm (neither runny nor hard), it’s ready. It will be a golden orange color. If the marmalade is runny, continue cooking it; if it’s hard, add a bit more water.

Pour the marmalade into clean hot Mason Jars; wipe the rims thoroughly with a clean, damp paper towel, and seal with the lids. Chill in the refrigerator. It may take 24-48 hours for the natural pectin to set up properly.

Notes:

Oranges: This recipe is made with regular seedless oranges. You can definitely substitute Seville oranges if you can find them. They are only in season from the end of January to mid-February, but they have an intense flavor that is ideal for marmalade.

Yield: This recipe makes about 3 quarts (96 ounces) of marmalade:

If using 1/2-pint (8 ounce) jars, you’ll need 12.

If using 1 pint (16-ounce) jars, you’ll need 6.

If using the tiny jelly jars (4 ounces), you’ll need 24.

Storage: Store covered in the refrigerator for up to 1 month.

Cold-plate test: To test if your marmalade is ready, spoon some hot marmalade onto a plate and put it in the freezer to chill, or spoon some over an icy cold plate fresh from the freezer. If the mixture wrinkles slightly when you draw a spoon or finger across it, it has reached the setting point and is ready to go! If not, keep boiling and make sure the temperature reaches 220 degrees.

Don’ts:

Pectin: While many jam and jelly recipes require added pectin, you don’t need to add any here. Pectin is naturally concentrated in the pith of the orange (the bitter white part under the peel). This recipe coaxes out that natural pectin by letting the citrus soak overnight and then boiling it rapidly until enough water has evaporated that the mixture can reach 220 degrees.

Agave nectar: Agave cannot penetrate and sweeten the peel as well as sugar can. When I tested it, the consistency was fine, but the rind tasted like raw rind. I don’t recommend this substitution.

Low sugar: I haven’t tested low-sugar/alternative sweeteners in this recipe other than agave as listed above, nor have I tweaked the amount of sugar in the recipe. I recommend seeking out recipes from experts in that area.

Slow cooker: While it is technically possible to make marmalade in your slow cooker, it really depends on the power of your appliance. I no longer recommend that method because it isn’t reliable enough.

Even with an overnight soak, the IP doesn’t break down the rind sufficiently. I don’t recommend this method

I don’t recommend making this recipe in a regular cast iron pan. It should be made in a non-reactive pan. Enameled cast iron, stainless steel, and non-stick are best and will not affect the color or taste of the marmalade

Storing and Canning Orange Marmalade:

Storage: Store covered in the refrigerator for up to 1 month.

Freezer: Pack in freezer-safe containers or jars, leaving 1/2-inch of headspace for expansion. Label, date, and freeze for up to 3 months. Thaw overnight in the refrigerator.

Canning: If putting up for storage, use a hot water or steam canner with a rack to properly seal lids on canning jars according to canning instructions. Otherwise, refrigerate and use within the month. Or, freeze for up to 3 months.

Nutritional Facts:

Serving: 2tbspCalories: 68kcalCarbohydrates: 18gProtein: 1gFat: 1gSaturated Fat: 1gSodium: 1mgPotassium: 13mgFiber: 1gSugar: 17gVitamin A: 13IUVitamin C: 4mgCalcium: 4mgIron: 1mg

Recipe courtesy of Culinary Hil.com

2 Likes

Pineapple Dip Recipe

Prep: 5 minutes
Chill time: 2 hours
Total: 2 hours 5 minutes
Servings: 8

Ingredients:

1 8 ounce cream cheese
1 7-ounce marshmallow creme or fluff
1 8-ounce thawed whipped topping
1 20 ounce crushed pineapple, drained
½ cup powdered sugar
1 teaspoon vanilla

Directions:

In a large bowl, mix together the softened cream cheese with the powdered sugar and vanilla extract until creamy.

Next, mix in the marshmallow creme.

Using a spatula, gently fold in the Cool Whip and then the crushed pineapple.

Cover and place in the refrigerator. Chill for at least 2-3 hours before serving.

Notes:

You will want to let the cream cheese soften, and the Cool Whip thaw before preparing the dip.

Make sure to use powdered sugar, not granulated sugar.

Be sure to drain the crushed pineapple so that it doesn’t make your dip watery.

Variations:

Mini marshmallows: Try stirring in mini marshmallows for more texture.

Crushed cookies: You could stir in crushed Nilla wafers, Golden Oreos, or graham crackers for extra texture and flavor.

Coconut: Add even more tropical flavor with shredded coconut.

Nuts: Add chopped pecans or macadamia nuts for a little crunch.

Storage:

Store this dip in the refrigerator for up to 3 days. After 2-3 days, it starts to become a little runny.

This pineapple dip does not freeze well.

Nutritional Facts:

Calories: 32kcal | Carbohydrates: 8g | Protein: 0.01g | Fat: 0.1g | Saturated Fat: 0.04g | Polyunsaturated Fat: 0.001g | Monounsaturated Fat: 0.01g | Cholesterol: 0.1mg | Sodium: 1mg | Potassium: 1mg | Fiber: 0.001g | Sugar: 8g | Vitamin A: 2IU | Vitamin C: 0.01mg | Calcium: 0.4mg | Iron: 0.01mg

Recipe courtesy of Food Lovin Family.com

2 Likes

Honey Mustard Dipping Sauce

Servings 8 servings (2 Tbs each serving)
Prep Time: 5 minutes
Total Time: 5 minutes

Ingredients:

1/2 cup mayonnaise
3-4 tablespoons honey
2 tablespoons yellow mustard
1 tablespoon Dijon mustard
1 tablespoon apple cider vinegar or lemon juice
Pinch of salt and pepper

Directions:

Get prepped: Measure out all ingredients and have a small mixing bowl ready.

Mix: In the mixing bowl, whisk together mayonnaise, honey, yellow mustard, Dijon mustard, and apple cider vinegar (or lemon juice) until smooth.

Season: Add a pinch of salt and pepper, adjusting to taste.

Chill: Cover and refrigerate for at least 30 minutes before serving to let flavors meld.

Notes:

Use good-quality mustard for the best flavor.

Chill before serving to let flavors meld.

Adjust the sweetness or tang to your preference.

Make a double batch if serving a crowd.

Store in a squeeze bottle for easy use.

How to Make It Spicy:

If you want a little heat, this sauce takes it well. A pinch of cayenne is the easiest add – start small and taste as you go. A splash of your favorite hot sauce works too, and gives it a slightly different kind of heat depending on what you use. Frank’s keeps it mild and tangy; something like Tabasco will give it more of a kick.

How to store leftovers:

Keep in an airtight container in the fridge for up to 1 week.

Nutritional Facts:

Calories: 61kcal | Carbohydrates: 8g | Protein: 0.3g | Fat: 3g | Saturated Fat: 0.5g | Polyunsaturated Fat: 2g | Monounsaturated Fat: 1g | Trans Fat: 0.01g | Cholesterol: 2mg | Sodium: 178mg | Potassium: 18mg | Fiber: 0.3g | Sugar: 7g | Vitamin A: 14IU | Vitamin C: 0.1mg | Calcium: 5mg | Iron: 0.1mg

Recipe courtesy of Kylee Cooks.com

2 Likes

Quick Pickled Red Onions

Prep Time: 5 minutes
Total Time: 35 minutes
Servings: 8

Ingredients:

1 large red onion
3/4 cup apple cider vinegar
1/2 cup hot water
1 to 2 tablespoons granulated sugar, can use honey or pure maple syrup
1 teaspoon kosher salt

Directions:

To slice the onion, cut it in half to create half-moons. Use a very sharp knife or mandoline to create uniform, thin slices. You want the slices to be about 1/8-inch thick.

In a medium jar or bowl, combine the vinegar, warm water, sugar, and salt. Stir until sugar and salt dissolve.

Add the red onion slices and stir, making sure the onion is covered. Let it sit for 30 minutes at room temperature.

Serve immediately or store in the refrigerator in a sealed jar or container for up to 3 weeks.

Notes:

Keep pickled red onions in a jar or an airtight container in the fridge for up to 3 weeks.

Reuse the Brine:

Pro tip: If you eat the onions quickly, you can reuse the brine. Add more sliced red onions to the mixture and start again.

You can also try pickling other sturdy vegetables like sliced radishes, carrots, or small cauliflower florets.

If the brine is cloudy or has a bad odor, discard and start with a fresh batch. I never reuse the brine more than once.

Variations:

I love plain pickled red onions, but if you want to add some extra flavor, here are some options!

Add ½ teaspoon or 1 teaspoon of whole peppercorns to the jar for a peppery flavor.

Add fennel seeds, mustard seeds, or cumin seeds.

Add 1 or 2 peeled, smashed garlic cloves to the jar for a garlicky kick!

Stir in few sprigs of fresh herbs like dill, thyme, oregano, or rosemary. Your jar will be so pretty!

Add a few jalapeĂąo slices for a little heat. Alternatively, you can add a few dashes of crushed red pepper flakes.

FAQ:

How long do pickled red onions keep for?

Store pickled red onions in a jar or airtight container for up to 3 weeks in the refrigerator. If you add fresh herbs, they are only good for 1 week.

Can I double this recipe?

Yes, you can double or triple the recipe. Keep the ratio of the ingredients the same. You can divide the onions between several jars or use one large jar.

Do I have to boil vinegar for pickling red onions?

This is a quick pickle recipe so you don’t have to boil the vinegar. Make sure you use hot water to dissolve the sugar and salt. Also, I don’t like to boil the liquid mixture because it softens the onions too much. I like my pickled red onions slightly crunchy.

Nutritional Facts:

Calories: 16kcal, Carbohydrates: 3g, Protein: 0.5g, Saturated Fat: 6g, Sodium: 292mg, Potassium: 37mg, Fiber: 1g, Sugar: 2g, Vitamin A: 1IU, Vitamin C: 1mg, Calcium: 5mg, Iron: 1mg

Recipe courtesy of Two Peas and Their Pod.com

2 Likes

Raspberry Mint Jam

Yield: 8 half-pints
Prep: 20 min
Cook: 10 min

Ingredients:

8 cups fresh raspberries
6-1/2 cups sugar
1/2 teaspoon butter
2 pouches (3 ounces each) liquid fruit pectin
1 cup minced fresh mint

Directions:

In a Dutch oven, combine raspberries, sugar, and butter. Bring to a full rolling boil over high heat, stirring constantly. Stir in pectin. Continue to boil 1 minute, stirring constantly.

Remove from heat; skim off foam. Stir in mint. Ladle hot mixture into eight hot half-pint jars, leaving 1/4-in. headspace. Remove air bubbles and adjust headspace, if necessary, by adding hot mixture. Wipe rims. Center lids on jars; screw on bands until fingertip tight.

Place jars into the canner with simmering water, ensuring that they are completely covered with water. Bring to a boil; process for 10 minutes. Remove jars and cool.

Notes:

Canning Altitude Jam-Jelly:

The processing time listed is for altitudes of 1,000 feet or less. Add 1 minute to the processing time for every 1,000 feet of additional altitude.

Nutritional Facts:

2 tablespoons: 83 calories, 0 fat (0 saturated fat), 0 cholesterol, 1mg sodium, 21g carbohydrate (20g sugars, 1g fiber), 0 protein.

Recipe courtesy of Taste of Home.com

2 Likes

Strawberry-Avocado Salsa

Duration: 5 mins
Cook Time: 5 mins
Servings: 4

Ingredients:

1 cup finely diced fresh strawberries
1 cup finely diced avocado (1 medium)
½ cup finely chopped sweet onion
2 tsp freshly squeezed lime juice
2 tsp finely chopped jalapeĂąo, seeds and ribs removed
Tortilla chips, for dipping

Directions:

Combine all of the ingredients (except tortilla chips) in a medium bowl. Serve immediately with the tortilla chips.

Recipe courtesy of Parade.com

2 Likes