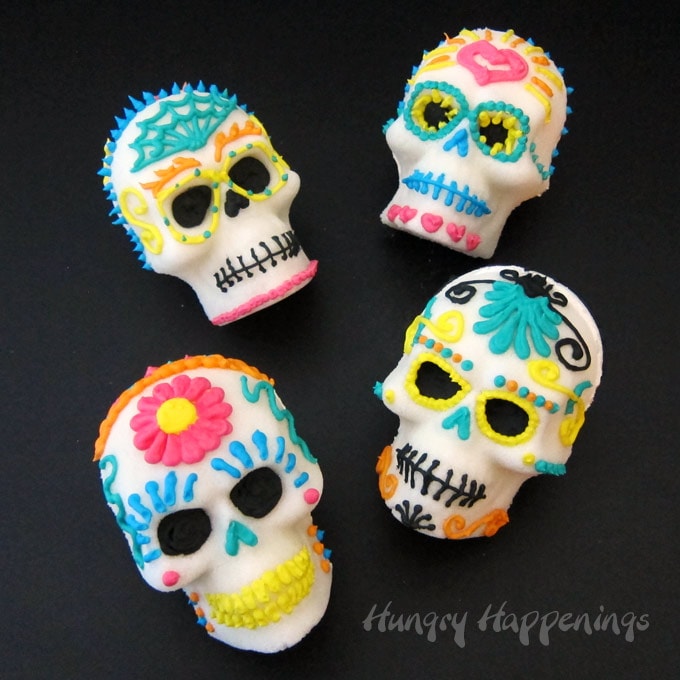
Note from Amethyst: I’m not sure if I can count this as food or not. I mean, it’s made with food, but it’s more of a decoration. They’re not meant to eat. But I had to include them in case anyone here is crafty enough to want to make one!
Sugar Skull Video Tutorial
Prep Time: 1 hr
Drying time: 1 d
Total Time: 1 hr
Ingredients:
Sugar Skulls:
¼ cup meringue powder
6 cups granulated sugar
⅓ cup water
Royal Icing:
7 ½ teaspoon meringue powder
6 teaspoons water
1 pound powdered sugar
1 teaspoon almond extract (optional)
food coloring
Directions:
-
Mix the sugar, meringue powder, and water together until the sugar holds together when squeezed. If the sugar is too loose, add a bit more water.
-
Fill both the front and back of the skull mold with the wet sugar, compacting it tightly so that there are no air holes. Scrape off the excess so that the tops are flat.
-
Cut some parchment paper and cardboard so that they are a bit bigger than the skull mold. Set the parchment paper over the top of the mold, then set the cardboard on top of the parchment paper. Grab onto the mold and cardboard, and carefully flip them upside down and set them on the counter. Carefully lift the mold up off the sugar skulls. The mold should come right off. If the sugar sticks, it’s too wet. Scrape it out of the mold, clean the mold, add some more dry sugar to the mixture, and try molding it again. If your sugar skulls do not hold together, you will need to add a bit more water.
-
Allow your sugar skulls to dry for at least 6 hours before flipping them over so that the other side can dry as well. Let them dry for a minimum of 12 hours.
-
Make royal icing by whisking the water and meringue powder, then adding the powdered sugar and almond extract and beating until it begins to lose its shine.
-
Spread a thin layer of royal icing on the flat part of the backside of each skull. Press the front and back sides together. Use your finger to wipe off the icing that oozes out from between the two pieces. Allow the icing to dry for at least an hour before decorating your skulls.
-
Color the royal icing using food coloring, then spoon it into pastry bags fitted with small round tips.
-
Pipe royal icing onto the skulls, creating any designs you like.
-
Allow the icing to dry for several hours before using them to decorate your Day of the Dead altar.
Notes:
The entire process from start to finish will take approximately 24 hours due to all the drying time.
These skulls can be eaten, but they are really supposed to be used as decoration, not as a dessert.
Sugar skulls need to dry hard, so it is best not to make them on humid days when there is too much moisture in the air.
Recipe and Video at Hungry Happenings.com